Brake caliper sticking is one of those rare issues that not many car owners get to deal with. But, when it happens to you, it can be a pain to diagnose and fix. To make things even more confusing, a sticking caliper isn’t always obvious either. Sometimes you won’t even know you have an issue until the caliper completely seizes up.
Today, we’ll explain what causes a caliper to stick, how to recognize if you’re dealing with this particular issue, and how to get your caliper fixed. Considering how important the brakes are on your car, we urge you to grab a cup of coffee and dive into the information we’re about to share. It could very well impact your safety and the safety of your passengers!
Article updated on 08/12/22. Original publishing date 03/10/21

How do Brake Calipers Work?
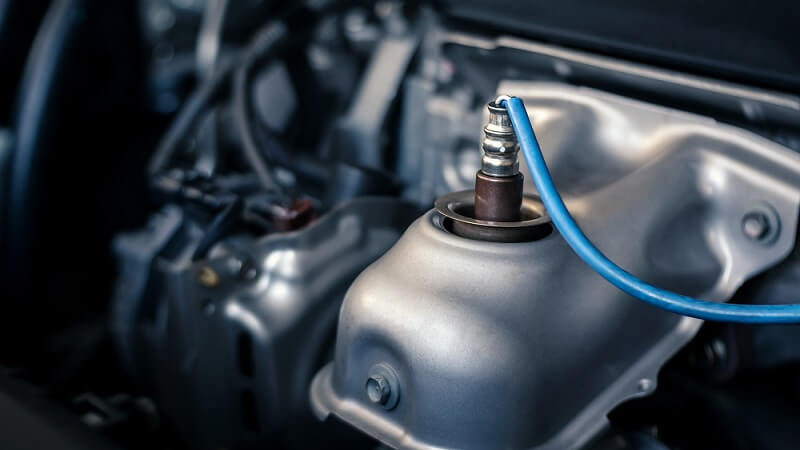
Brake calipers use hydraulic pressure created by the master cylinder to engage the brake pads and force them to sandwich the brake rotor from two sides. Once you release the brake pedal, the piston retracts back into the caliper, allowing the rotor to spin free. The whole caliper assembly moves on two slider pins, which also happen to be important for our discussion today.
Despite the appearance of an average brake caliper, these are pretty simple devices. Here are the main components of a brake caliper:
- Caliper piston(s)
- Main seal that sits between the piston and the cylinder wall
- A rubber protective boot
- Two slider pins
- Caliper body
- Caliper bracket.
With so few components and moving parts, there is really not much that can go wrong. And that’s a good thing when it comes to safety.
However, things do go wrong from time to time. Protective boots tear, main seals fail, and slider pins begin to catch. Fortunately, even when things go wrong with your brake calipers, rarely will they fail in a way that leaves you unable to brake. In the odd instance that you experience such a failure, you still have 3 other calipers/brake drums to slow you down.
Why Is Your Brake Caliper Sticking — Common Causes?
Brake caliper sticking is caused by one of three things — slider pin seizing, caliper piston seizing, or brake line obstruction. To make things worse, one can cause the other two, so it’s not uncommon to run into all three, or at least two of the above issues when you start pulling the caliper apart.
Seized Up Slider Pins
Slider pins are what allow the caliper to apply even pressure on both brake pads. These pins are designed to allow the caliper to move freely.. When they begin to seize up, so will the caliper.
The number one reason for slider pin issues is the lack of lubrication. Not all slider pin designs are the same, but they all require lubrication to work properly. You’ll usually find that each pin has a tiny protective boot of its own that prevents any water, debris, and grime from getting stuck inside the slider pin bore.
If these boots fail and debris finds its way inside, you get friction between the pins and the bore they sit in. Given enough contamination, the pins may seize up completely.
Silicone Grease

To prevent all of this, you need to inspect the rubber boots and lubricate the pins every time you do your brakes. Some people even go as far as lubricating the pins once a year, usually before winter.
Even though people tend to use all kinds of lubricants for this purpose, you should only use silicone grease to lube up the slider pins. Silicone is safe for rubber and won’t make it brittle over time, which can’t be said for other types of lubricants. Petroleum-based lubricants will eat away at rubber, causing it to degrade over time.
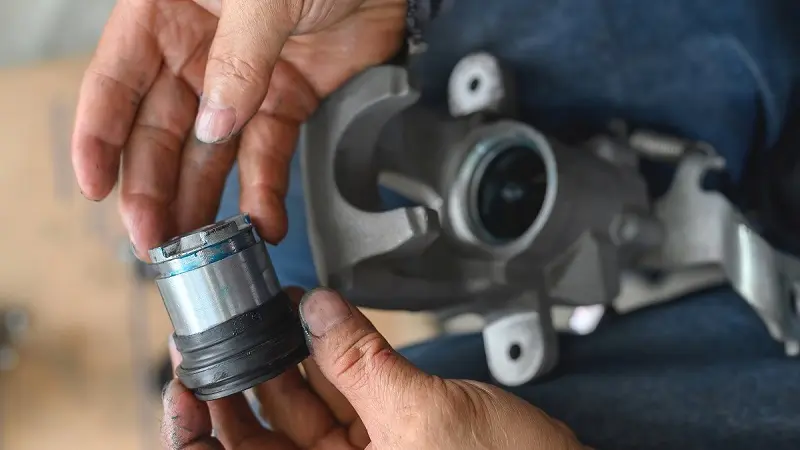
Seized Up Brake Caliper Piston
Brake caliper pistons can also seize up, causing all kinds of trouble. There are generally two ways why these seize up, and both have to do with the rubber boot that sits between the piston and the caliper body.
Contrary to popular belief, the main purpose of this rubber boot isn’t to create a barrier between the piston and the brake fluid that sits behind the piston. Instead, its job is to prevent any water, dirt, and other debris from reaching the actual rubber seal that sits deeper inside the caliper.
Once the boot tears or becomes otherwise compromised, the inner seal becomes exposed to the elements. Unfortunately, it doesn’t need much to fail. If you were to open up a brake caliper, you’d find a groove about an inch or so below the edge of the cylinder bore. This is where the rubber seal sits.
However, it doesn’t remain there as the piston is moving back and forth.
Instead, the seal rolls over the piston and acts as a spring of sorts that helps the piston retract when you let go of the brakes. Now imagine if your caliper piston boot failed and some dirt, rocks and other debris found their way into the cylinder bore. The rubber seal often picks up this debris as it rolls over the piston, causing damage to itself, and also the surface of the piston.
This is why you often see pitting all over the caliper piston surface when you tear down a seized-up caliper. At this point, you can’t just replace the seals/rubber boots. You need to replace the piston as well.
Rear Caliper Piston Sticking

While most of the stuff described above applies to rear brake calipers as well, there are a few more things you need to take into consideration. Depending on the car you drive, your emergency brake assembly may be integrated into your brake caliper.
When you press the brake, the caliper piston rotates back and forth, instead of just moving freely as it does in the front. Then, when you pull the emergency brake, the piston rotates ever so slightly to engage the pads to the rotors.
If you don’t use your emergency brake often enough, the caliper piston could seize up within those few rotations it takes to engage the emergency brake. You’ll usually notice this when you wear down the pads to a point where they need replacing, and you have to wind back the piston. Check your car’s service manual to see what kind of brake calipers you’ve got in the rear.
Brake Line Obstruction
Brake lines and brake hoses are far more delicate than people think. When left alone, they’ll outlast most other parts of the vehicle. But, twist them or bend them the wrong way, and they’re toast. What most people don’t know is that brake hoses are braided on the inside.
They usually feature some sort of polymer mesh that is easily damaged when you mishandle the brake hose. Sometimes the hose can get obstructed by a piece of debris that has somehow found its way inside. Additionally, damaged brake hose lining can also develop an obstruction.
Whatever the case may be, if the hose becomes clogged, the fluid inside the caliper has nowhere to go. At that point, the pistol will remain stuck in whatever position it was in before the obstruction occurred.
Symptoms of a Sticking Brake Caliper
A brake caliper sticking can cause all kinds of issues. More often than not, you’ll notice that something is wrong right away, but not always. Here are a few common symptoms that you might experience if your caliper begins to stick.
- Smoke coming from behind a wheel
- Car pulling to one side
- Humming noise that gets worse as you accelerate
- Steering wheel vibrations (front calipers affected)
- Increase In fuel consumption
The easiest way to check whether any of your calipers are sticking is to put your hand close to the wheel. When a caliper sticks in a way that causes most of the symptoms above, it will create a whole lot of friction, and hence heat.
That heat will transfer to all parts of the wheel assembly. We’re talking brake rotors, wheel hub, wheel bearing, the wheel itself, you name it.
Sure, wheels get hot when you drive even when everything is fine. But you’ll a very tangible difference in heat coming from the wheel that sits on top of a seized-up brake caliper. With that said, let’s go through each of these symptoms and explain what’s going on.
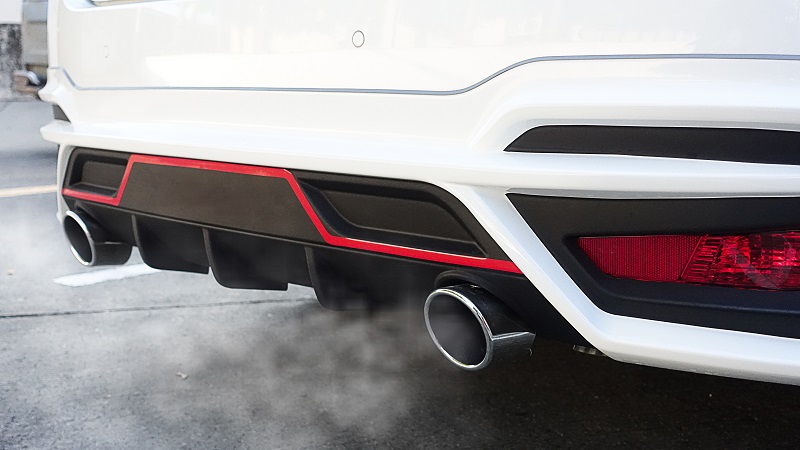
Smoke Coming From Behind a Wheel
Seeing smoke coming from anywhere in your car is cause for alarm. Fortunately, if your wheel is smoking because of a brake caliper sticking, it most likely won’t catch on fire. What you’re seeing is your brake rotor being pushed to the absolute limits of its temperature handling abilities. A smoking rotor means that your caliper is about as seized up as it can be.
One thing to keep in mind when you run into this symptom is that prolonged exposure to this type of heat can damage other parts near the caliper/rotor. Excess heat can cause issues with the brake hose, wheel bearings, ABS sensors, etc.
Car Pulling to One Side
Having one caliper constantly braking will cause a difference in the rolling resistance between the left and the right side of your car. Depending on how bad the problem is, you could also experience your car pulling to one side as you drive. Rotor overheating usually follows this symptom, as it implies constant braking.
Humming Noise That Gets Worse with Acceleration
Friction causes noise, especially when we’re talking about prolonged friction that pushed the braking components outside their normal operating conditions. If it’s been a while since the caliper seized up, your rotor may be warped. In some cases, the noise you’re hearing, especially if it has a frequency to it, is the pads rubbing against a warped rotor as it spins.
It’s worth mentioning that a warped rotor may also produce a vibration on the brake pedal as you force the brake pads to clamp down on what is essentially an uneven surface.
Steering Wheel Vibrations
The same issues that sometimes cause cyclic humming noise emanating from a rotor can cause steering wheel vibration. When a rotor warps, it may warp so badly that some part of its surface keeps rubbing the pad even when there is no brake actuation present. This intermittent contact will cause steering wheel vibration if the amount of rotor warping is severe enough.
Increase In Fuel Consumption
One symptom that is rarely talked about is a tangible increase in fuel consumption. Most of us know how much fuel our cars use under different conditions. When you see that MPG drop considerably without any explanation, there’s a chance that you have a brake caliper sticking.
How to Diagnose a Sticky Caliper?

If suspect that you’re dealing with a brake caliper sticking on one corner of your vehicle, the absolute best way to diagnose the issue is to inspect the caliper and try to push back the piston. To find which caliper is the one that’s causing all the trouble, go around your vehicle and feel each wheel as you pass it. The one that is considerably hotter than the rest will most likely be the one you’re looking for.
Furthermore, if you are experiencing symptoms such as the car pulling to one side, or steering wheel vibrations of any kind, you are most likely looking at a bad caliper somewhere in the front. Here’s a brief step-by-step guide on how to diagnose a sticking caliper.
Step 1 — Find the Seized Up Caliper
Get your car up on jack stands (safely) and put it into neutral. Go around the vehicle and spin every wheel by hand. The one that isn’t spinning or is putting up way more resistance than the rest is most likely the culprit. Remove the wheel to reveal the caliper. If you’re working on front wheels, turn the wheel hub towards you so that the caliper is pointed to the outside of the wheel well.
Step 2 — Remove the Caliper From the Bracket
The only way to tell whether a caliper is seized up for sure is to inspect the piston. You can’t do that without taking the caliper off the bracket. This does a couple of things. For one, you’ll be able to tell whether the slider pins are moving freely or not. Inspect the brake pads. Is the inner one wearing out faster than the outer one? If so, the pins may be sticking.
Most importantly, you’ll be able to visually inspect the piston, piston boot, and other parts of the caliper. If the boot is cracked, and you can see the piston through the crack, chances that dirt and water made their way in and caused an issue with the main seal.
How to Fix a Sticking Caliper?
Fixing a sticking caliper depends on what’s causing it to stick. If it’s just some grit that found its way inside the slider pin bore, you might get away with just cleaning the pins and relubricating them.
However, things are rarely that simple. In most cases, you’ll need to either rebuild the caliper or get a new one. There are brake caliper rebuild kits out there that you can get for fairly cheap. Keep in mind that 8 times out of 10 you’ll also have to get a replacement piston. At that point, depending on what you drive, you might be better off getting a refurbished caliper and simply replacing it.
That said, if you’re adamant about rebuilding your caliper, here’s what you need to do.
Step 1 — Remove the Caliper
We’ll assume that your car is on jack stands, the wheel is off, and you have all the tools necessary to get on with this project. The first step is removing the caliper. Undo any brake hose brackets so that you can move the caliper out of the way without damaging the brake hose.
To remove the caliper, you’ll need to unbolt the two slider pins, which will allow you to separate the caliper from the bracket. Next, remove the brake hose from the caliper.
Step 2 — Plug the Brake Hose
There are several ways you can prevent the brake fluid from leaking from the brake hose. Using vise grips is NOT one of them. Brake hoses are braided on the inside. Using vise grips to pinch the hose will damage the braiding.
Instead, use rubber caps to prevent the fluid from leaking. If your caliper uses a banjo bolt setup, find a piece of rubber hose that fits snug inside the banjo fitting.
Step 3 — Disassemble the Caliper

Now that you have the caliper dismounted and hopefully on a workbench somewhere, it’s time to tear it down. The best way to push the piston out is to use an air compressor. Put the compressor nozzle where the brake line goes, and pump the caliper full of air.
A word of caution — the piston will come out with force. Lots of force. To prevent injuries, use a piece of wood and place it inside the caliper like you would a brake pad. That wood should stop the piston from flying out and potentially hurting someone. With the piston out, remove the protective boot and the caliper piston seal.
Step 4 — Inspect and Clean the Caliper Bore
With everything removed and disassembled, it’s time to inspect and clean everything up. The first thing you should be inspecting is the piston. Is it pitted? Is it rusted? If it’s only rusted, you could probably just clean it and reuse it. If it’s pitted, it needs to go.
Next, look inside the bore. Is there corrosion in the main seal groove? What about the cylinder itself? To clean any rust from these areas, it’s best that you use a fine brass brush. That way you’ll get most of the stuff off without damaging any surfaces.
Step 5 — Rebuild the Caliper

If you’re happy with the way your caliper is looking after cleaning it, it’s time to put everything back together. First, take your new piston seal and dunk it in brake fluid. Brake fluid is the only acceptable lubricant for this seal. Don’t use any other lubricant unless the rebuild kit instructions specifically call for it.
Carefully seat the piston seal inside the cylinder bore. Next, take the new piston and lubricate it as well. Slide the protective boot over the piston until it’s flush with the bottom of the piston. Now, carefully start working the piston into the cylinder. Take a pick tool and work the edge of the boot inside the lip of the bore.
Once fully seated, make sure that the protective boot isn’t pinched anywhere, or otherwise misaligned.
Step 6 — Install the Caliper
Now that you’ve got a fully rebuilt caliper, it’s time to install it back on the car. Installation is the reverse of removal. Lubricate the pins and brake pad hardware, install the pads, and bleed the system. Make sure that the bleeder valves are not seized up or damaged. Otherwise, you might be looking at a leak.
Every vehicle follows a specific brake bleeding procedure, so consult your owner’s manual to see how to get this done on your car.
How to Prevent the Brake Caliper From Sticking In the Future?
The only way to avoid the brake caliper sticking issue is to stay on top of the maintenance. Check your brakes every year, lube everything up when you do, and inspect the caliper hardware. If you notice a crack in the protective boot on time, you can get away with just replacing that piece instead of rebuilding the whole caliper.
That said, there are always instances of pure random luck where something can damage the boot without you even knowing it. However, such instances are rare.
When rebuilding a caliper. It’s essential that you use quality replacement parts. Here at Newparts.com, we carry a wide range of brake caliper rebuild kits for all kinds of cars. Check our offer to find a kit for your car!